Introducing LinksKit: Simplifying App Links for Swift Developers
Tired of repeatedly implementing essential links in your apps? LinksKit is the Swift package that handles it all—from legal requirements to cross-promotion—saving you time and boosting your app's visibility.
As an indie developer who has released nine apps in the past two years, I've encountered a recurring challenge: implementing essential links in each app. This repetitive task led me to create LinksKit, a Swift package designed to streamline the process of adding crucial links to your iOS, macOS, and visionOS apps.
Why I Built LinksKit
After launching multiple apps across various Apple platforms, I noticed a pattern. Each app required similar link sections:
- Legal links (privacy policy, terms of use)
- Support links (FAQs, contact email)
- App review deep link
- Social media links
- Cross-promotion for my other apps
Implementing these links became a time-consuming and repetitive process. And it was very different on the Mac, causing extra work for multi-platform apps. That's when I realized the need for a reusable solution, and LinksKit was born.
Why Every New App Should Use LinksKit
- Time-Saving: LinksKit provides a ready-to-use solution for common link requirements, allowing developers to focus on core app features.
- Compliance: It ensures your app includes essential legal links, helping you meet App Store guidelines effortlessly.
- Cross-Promotion: LinksKit makes it easy to showcase your other apps, potentially increasing your overall app portfolio's visibility.
- Networking Opportunities: The package allows you to promote apps from fellow developers, fostering a supportive community and potential cross-promotion partnerships.
- Customization: While offering pre-built solutions, LinksKit also allows for full customization to fit your specific needs.
- Platform Adaptability: It works seamlessly across iOS, macOS, and visionOS, adapting to each platform's UI conventions.
How to Use LinksKit
Getting started with LinksKit is straightforward, but before we dive into the code, let's discuss an important concept: the providerToken.
Understanding the providerToken
The providerToken is a crucial component in App Store marketing campaigns. It's a unique identifier for your developer account that helps track the effectiveness of your marketing efforts. When users click on links with your providerToken, Apple can attribute those clicks to your campaigns, providing valuable insights into your app's user acquisition. The word "campaign" makes it sound overly complicated, but it's really just a parameter indicating where users are coming from.
How to Obtain Your providerToken
Finding your providerToken isn't immediately obvious, but here's how to do it:
- Log in to App Store Connect
- Navigate to Analytics > Acquisition > Campaigns
- Click on "Create Campaign Link"
- Enter any text in the form (you don't need to actually create a campaign)
- In the Campaign Link preview, look for the
ptparameter - the value afterpt=is yourproviderToken
Remember, this token is the same for all your apps, so you only need to look it up once.
Basic Configuration
Now that you understand the providerToken, let's set up LinksKit in your app:
LinksKit.configure(
   providerToken: "123456",
   linkSections: [
      .helpLinks(appID: "123456789", supportEmail: "support@example.com"),
      .legalLinks(privacyURL: URL(string: "https://example.com/privacy")!)
   ]
)
This basic setup adds essential help and legal links to your app, including terms.
Comprehensive Example
Let's explore a more comprehensive example that showcases all built-in features LinksKit offers with social links, and links to your apps and your friends apps:
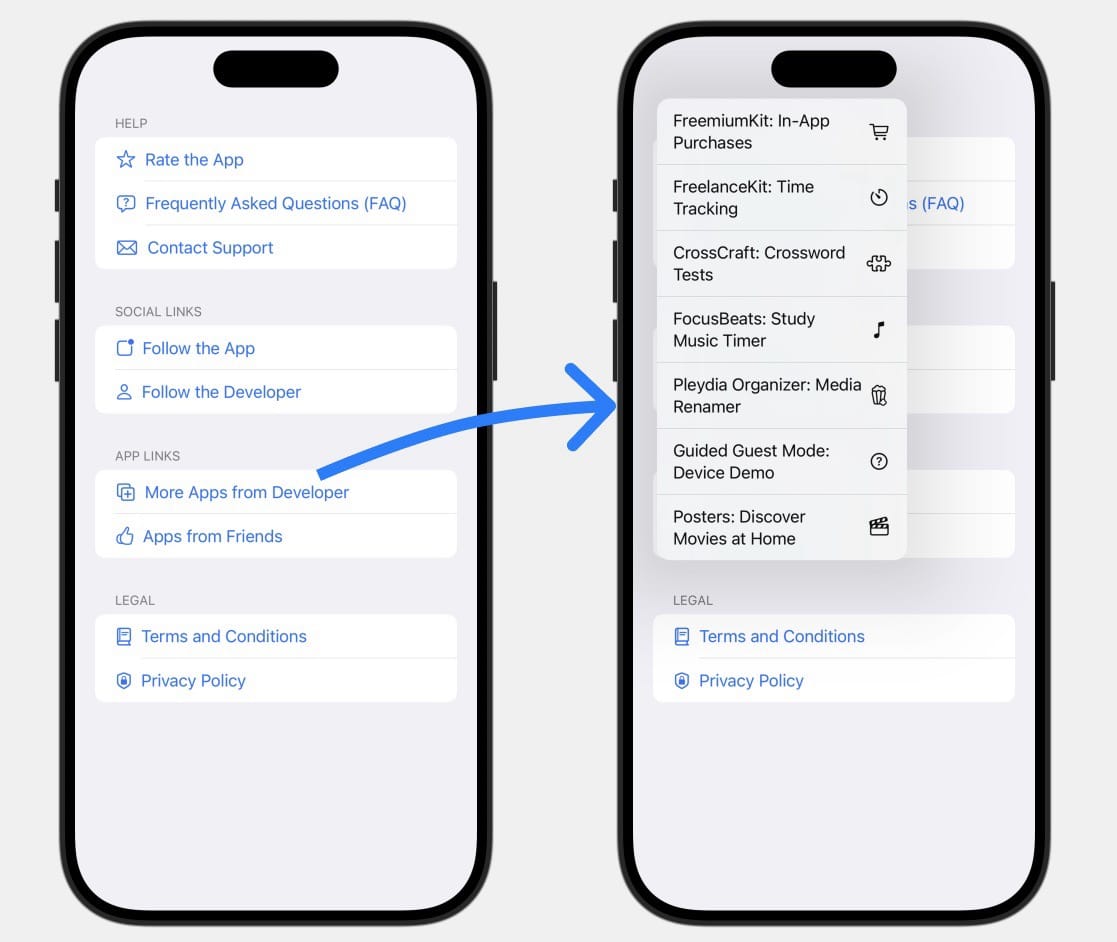
// App Links
let ownApps = LinkSection(entries: [
   .link(.ownApp(id: "6502914189", name: "FreemiumKit", systemImage: "cart")),
   .link(.ownApp(id: "6480134993", name: "FreelanceKit", systemImage: "timer")),
   .link(.ownApp(id: "6472669260", name: "CrossCraft", systemImage: "puzzlepiece")),
   .link(.ownApp(id: "6477829138", name: "FocusBeats", systemImage: "music.note")),
])

let friendsApps = LinkSection(entries: [
   .link(.friendsApp(id: "1249686798", name: "NFC.cool Tools", systemImage: "tag", providerToken: "106913804")),
   .link(.friendsApp(id: "6503256642", name: "App Exhibit", systemImage: "square.grid.3x3.fill.square")),
])

// Configure LinksKit
LinksKit.configure(
   providerToken: "549314",
   linkSections: [
      .helpLinks(
         appID: "6476773066",
         faqURL: URL(string: "https://translatekit.app/#faq")!,
         supportEmail: "translatekit@fline.dev"
      ),
      .socialMenus(
         appLinks: .appSocialLinks(
            platforms: [.twitter, .mastodon(instance: "mastodon.social"), .threads],
            handle: "TranslateKit",
            handleOverrides: [.twitter: "TranslateKitApp"]
         ),
         developerLinks: .developerSocialLinks(
            platforms: [.twitter, .mastodon(instance: "iosdev.space"), .threads],
            handle: "Jeehut"
         )
      ),
      .appMenus(ownAppLinks: [ownApps], friendsAppLinks: [friendsApps]),
      .legalLinks(privacyURL: Constants.legalPrivacyPolicyURL)
   ]
)
The above configuration I took (and simplified) from my app TranslateKit:
- Sets up help links with an FAQ and support email
- Adds social media links for both the app and the developer
- Creates a menu to promote my other apps
- Includes a section to promote friends' apps (great for networking!)
- Ensures all necessary legal links are present
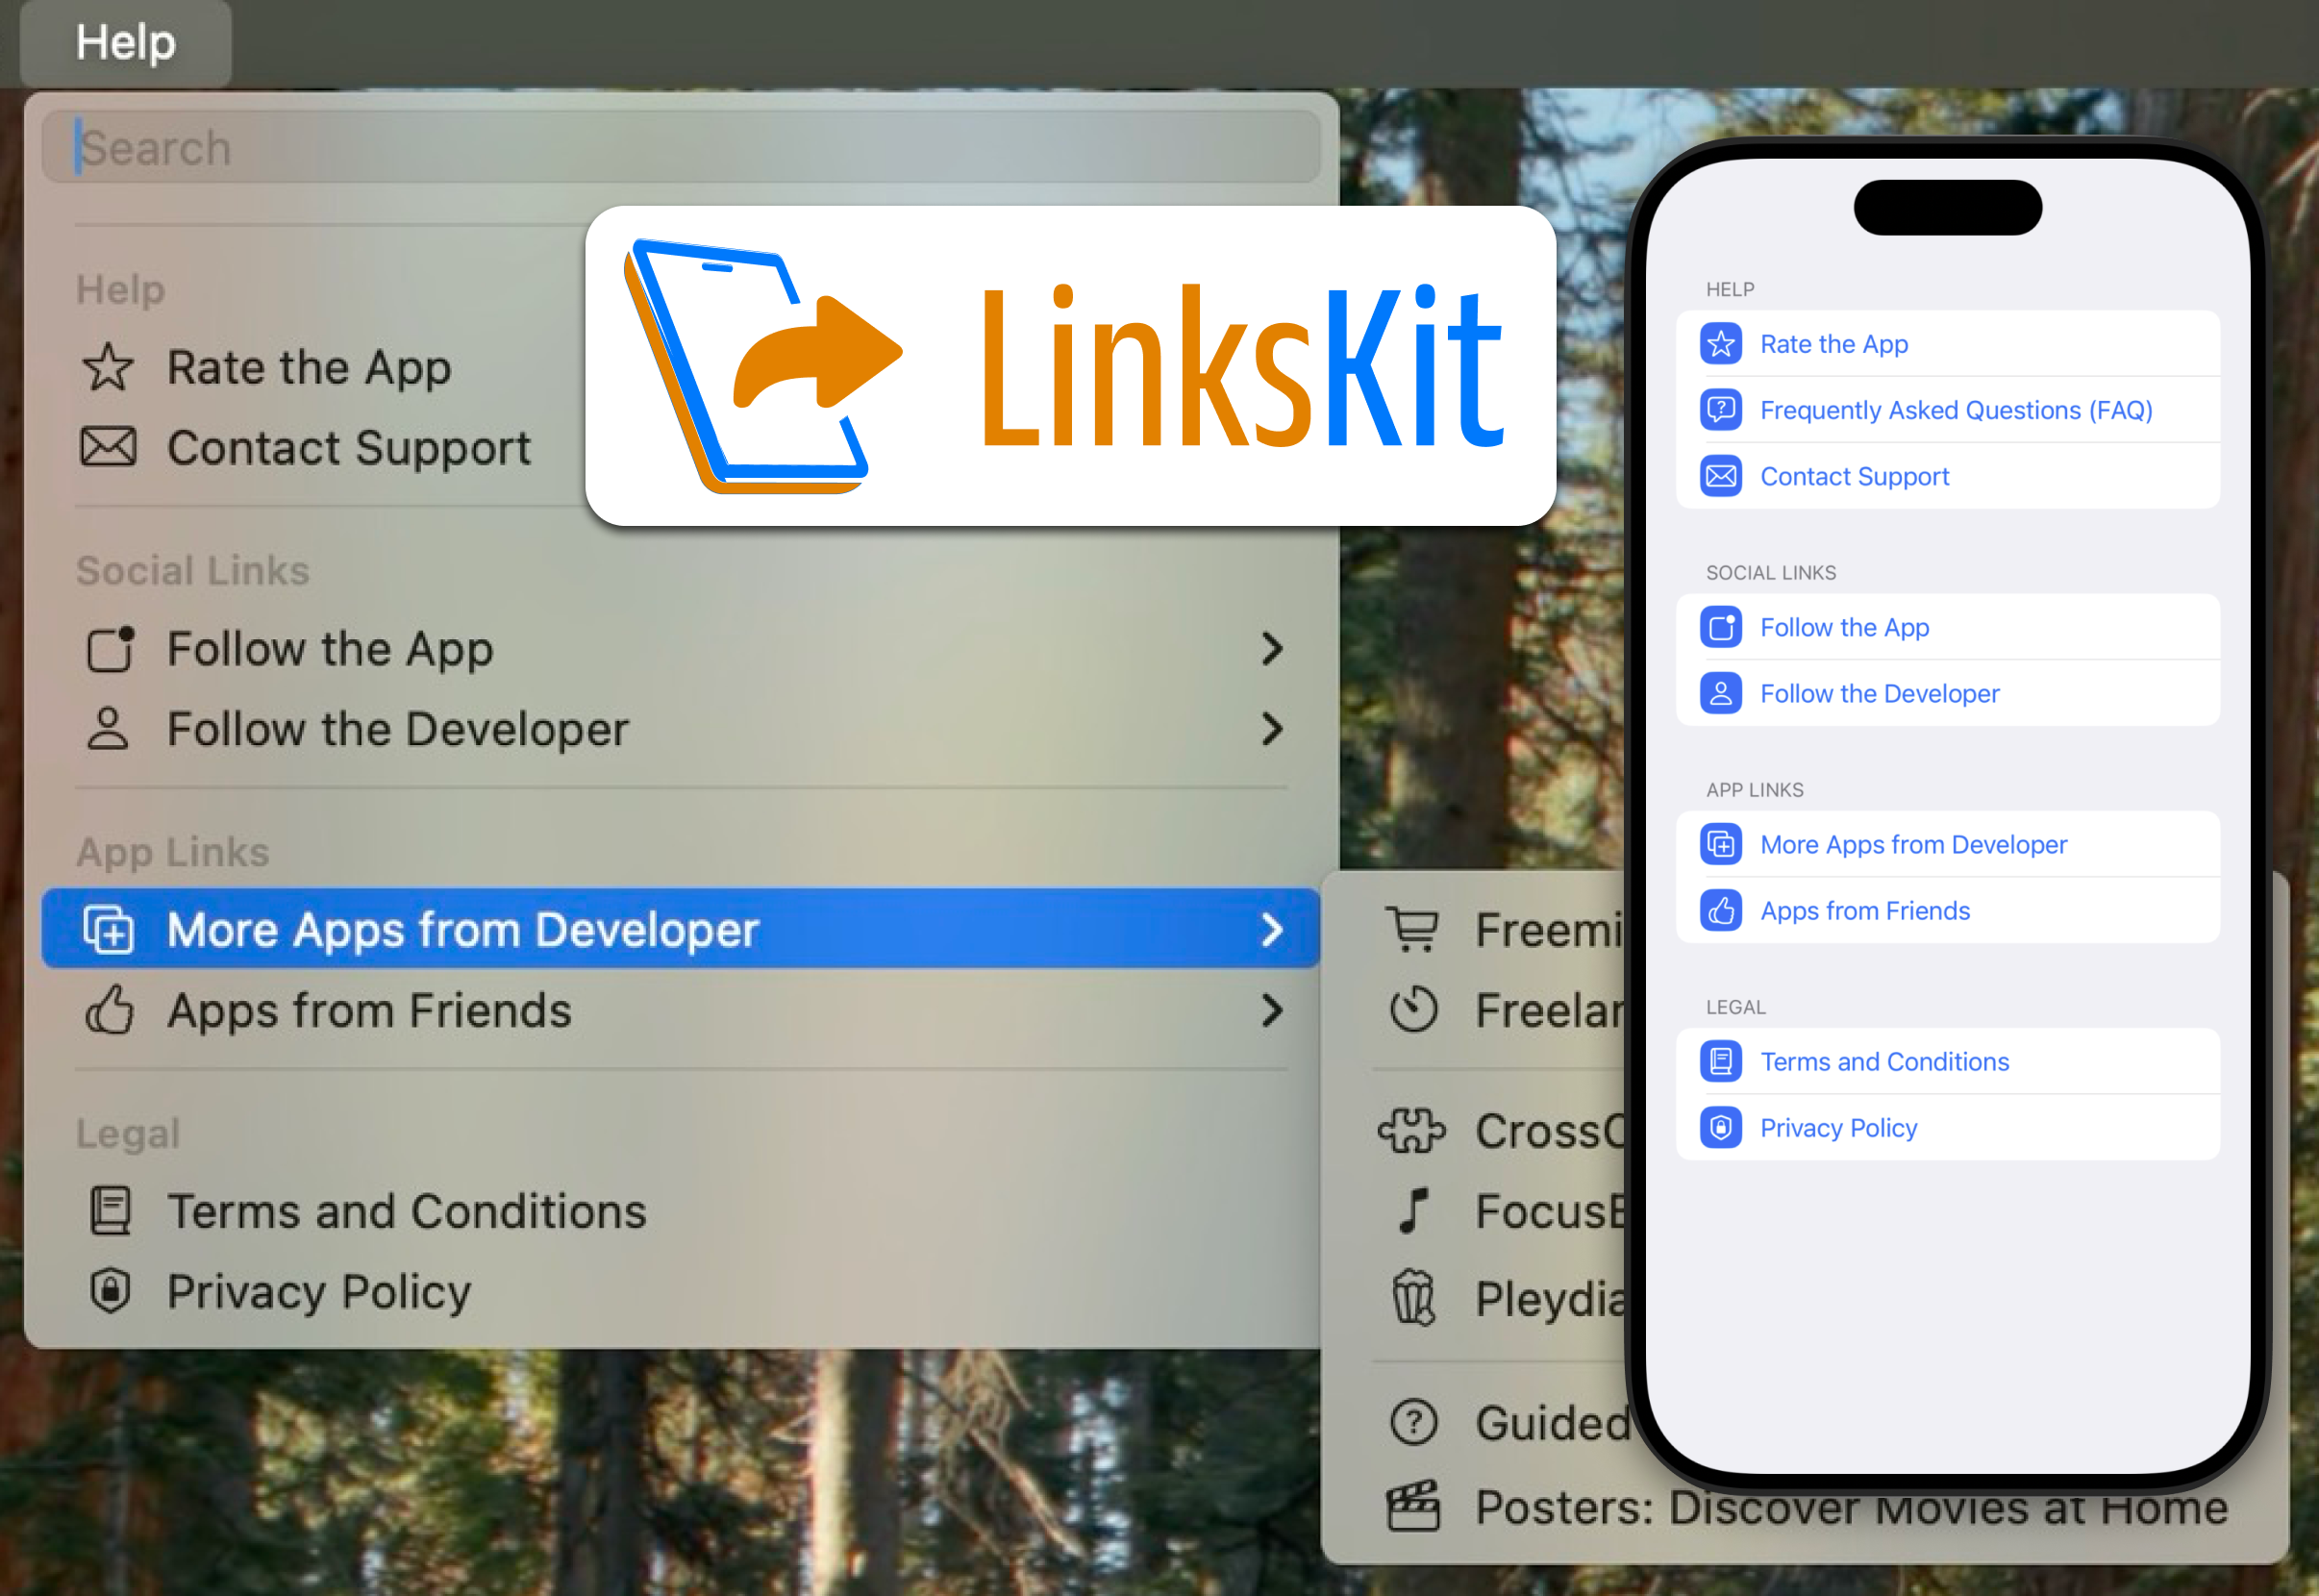
To use these configured links, simply add LinksView() to your settings screen:
Form {
   // Other settings...
   LinksView()
}
The result looks something like this on iOS:
On the Mac, it is more common to place links into the help menu. Do it like this:
WindowGroup {
   // your UI code
}
.commands {
   CommandGroup(replacing: .help) {
      LinksView()
         .labelStyle(.titleAndIcon)
   }
}
It will appear like this in the menu:

Custom Link Sections
While LinksKit provides pre-built sections, you can also create entirely custom sections using LinkSection. This flexibility allows you to add any type of link or nested menu structure you need.
Here's an example of a custom section:
let customSection = LinkSection(
    title: "Custom Links",
    entries: [
        .link(Link(title: "Our Website", systemImage: "globe", url: URL(string: "https://www.example.com")!)),
        .menu(LinkMenu(
            title: "Social Media",
            systemImage: "network",
            linkSections: [
                LinkSection(entries: [
                    .link(Link.followUsOn(socialPlatform: .twitter, handle: "YourAppHandle")),
                    .link(Link.followUsOn(socialPlatform: .instagram, handle: "YourAppHandle"))
                ])
            ]
        ))
    ]
)
This example demonstrates how you can nest menus and create a hierarchy of links to suit your app's needs.
Custom Label Styles
LinksKit offers flexibility not just in content, but also in presentation. You can easily customize the appearance of your links using SwiftUI's labelStyle modifier. LinksKit provides three custom label styles to enhance the visual appeal of your links:
.titleAndTrailingIcon: Similar to the default.titleAndIconstyle, but places the icon at the trailing end of the label..titleAndIconBadge(color:): Mimics Apple's Settings app style by adding a colored background to the leading icons..titleAndTrailingIconBadge(color:): Combines the trailing icon placement with the colored background.
To apply these styles, simply add the labelStyle modifier to your LinksView:
LinksView()
    .labelStyle(.titleAndIconBadge(color: .blue))
This simple modification can significantly alter the look and feel of your links, allowing you to match your app's design language or create a distinct visual hierarchy. Here's a visual comparison of these styles:
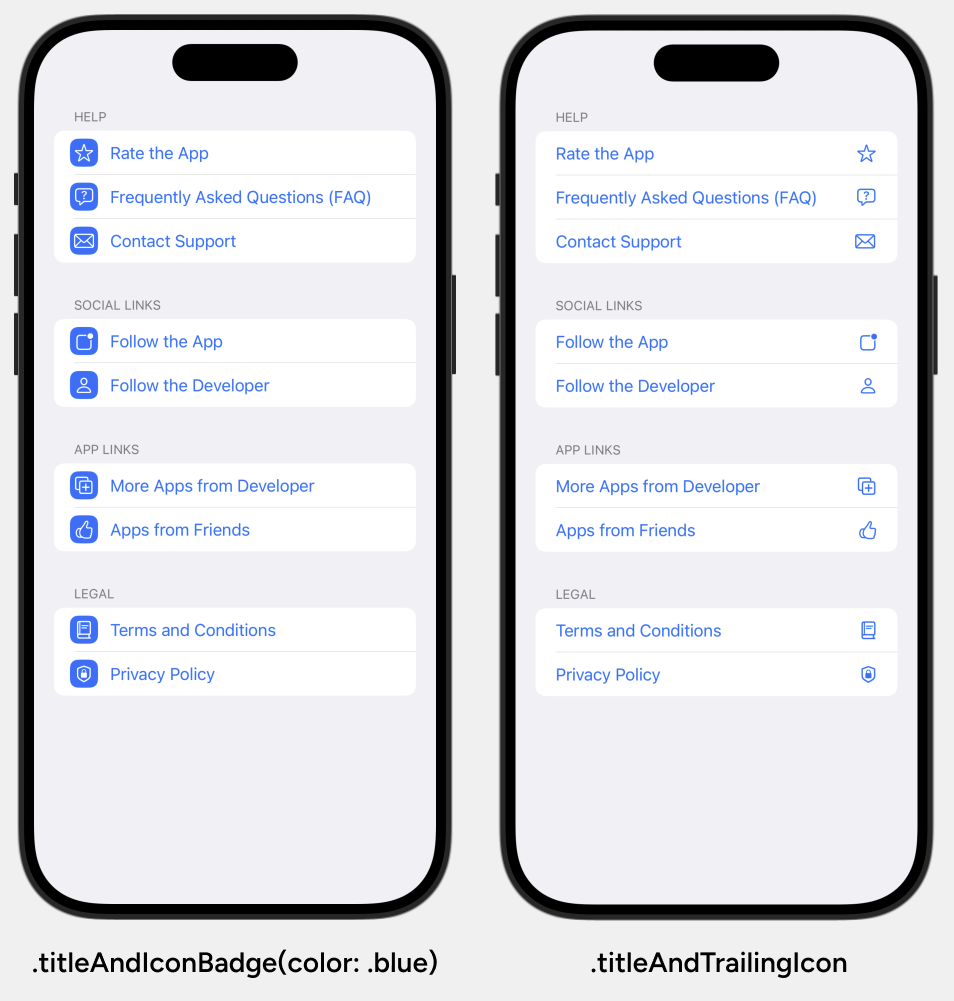
By leveraging custom label styles, you can create a unique and polished look for your app's link section, enhancing the overall user experience.
Conclusion
LinksKit is more than just a time-saving tool; it's a comprehensive solution for managing app links, ensuring compliance, and fostering developer networking. By handling everything from legal requirements to cross-promotion, LinksKit allows you to focus on what truly matters – creating great apps.
Whether you're a seasoned developer with multiple apps or just starting your first project, LinksKit can significantly streamline your development process. Give it a try in your next project and experience the benefits of simplified link management across all Apple platforms! I hope it helps.
A simple & fast AI-based translator for String Catalogs & more.
Get it now and localize your app to over 100 languages in minutes!